A video of excellent quality was captured, and is located here.
Friday, May 28, 2010
Video of early shakedown run
Last month the car was operated on its own, for the purpose of turning the car around and doing testing of the propulsion system and brakes.


Tuesday, May 11, 2010
Overhauling the brakes
 Let's review some earlier work. Many of the components of 1005's brake system have enjoyed an overhaul. Now we get a glimpse of the teardown of the brake cylinder. No, it hasn't been since 1956. You can see in the picture below, the innards of the cylinder.
Center is the piston itself, which moves inside the housing. The plate above it clamps a large rubber gasket. You can see the gasket on the edge of the picture being held by a volunteer.
Upper left is the non-pressure head of the cylinder, also viewable on the left side of the piston in the picture above. As you can see, it guides the piston and gives the spring a place to nest. The spring is a return spring, which assures the piston returns to its seat when pressure is released. Among other benefits, this also protects the piston shaft from the weather.
A hand powered forklift was used to lower the relevant sections from the car - as they are heavy. Parts were cleaned and painted, gasket renewed, and reassembled and returned to service.

Thursday, April 15, 2010
IT RUNS!

Dave Johnston reports: Yesterday afternoon SN 1005 was switched out of the shop in order to turn it around so the coupler can be installed at the rear of the car. The car was moved off shop track 2 and placed under trolley wire by diesel locomotive VE 502. Then the pole on 1005 was placed on the wire and the dynamotor compressors pumped the car up. With a small group of shop staff on board, the 1005 made two trips down the tail track and around the loop under its own power. With the exception of a sticky whistle valve, the car operated flawlessly. This is the first operation of the 1005 in over ten years.
The brake system has been converted back to the M 24 A and M2 B brake valves, which operated much better that the system it had since its Key System days. Work still needing to be done includes seat upholstery, upper sash, final paint, rear coupler, and lots of details.
Thursday, March 18, 2010
IT MOVED!
Sacramento Northern 1005 has moved under its own power! For the first time in a decade.
The reverser is complete and tested, and the wiring is intact.
If you were at Members Day, you know the PCC and caboose switched places in the shop. At that time, the truck was moved under the car, and work was completed on wiring the reverser.
The motors were jacked up, and one at a time, energized to confirm that they turn in the correct direction.
The car was lowered off its jacks. The four jacks, including the damaged jack, are now out from under the car.
Tuesday, insulating the traction motor wiring was completed.
Today, power was applied and the car moved. Only 8 feet, but one giant leap for the project.
Thursday, March 4, 2010
Spaghetti at the Western
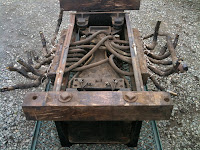
The reverser side rails are back and it's time to reassemble the reverser. Excuse this somewhat boring blog posting, it will simply contain the pictures the shop crew needs to rewire the unit correctly. Click on the picture to zoom in a lot.




Friday, February 19, 2010
Truck gets moved in place!

On Wednesday, the power truck is moved underneath the 1005. That means all the work on wiring, piping, electrical and painting is complete. Note how nice it looks in fresh new paint. All the painting was done by hand. Note the caboose behind is quickly coming into paint itself. We call it "Sacramento Northern 1632" but its real road number is something else. The Western Pacific head office had ordered this caboose scrapped, but the yard crews decided this was in better shape than 1632. So they swapped numbers, sending the real 1632 to scrap in its stead.
Note how many people it takes to move the truck. Two people can keep it rolling with all their strength, but it takes a man with a lever to start it moving. This is in stark contrast to, say, a roller bearing caboose, where one man can move the whole caboose. That is because of the traction motors, which have a lot of rotating mass, and each have four plain bearings inside (two armature bearings and two where it hangs on the axle.)
Rest assured, this crew did not push the truck the whole way. They used the shop switcher, "Muni 0305", which lasted about two weeks on the Muni as a line car, but has proven to be a "really useful engine" around the WRM's shop. While they were switching, they exchanged Muni PCC 1016 and the so-called 1632 caboose. That puts 1016 over the pit for a traction motor swap. All three units are nearly completed, and the race is on to see which finishes first.
Here is the truck in place under the car. Photos this post by Joe Magruder.

Friday, January 22, 2010
Reverser Blues
 The 1005's reverser has gotten a lot of service and it's in great shape electrically. But it became apparent that the reverser frame is badly cracked. It was dropped for repair.
The reverser is located near the truck and on the centerline of the car. There should be no risk of the wheel hitting it as the truck pivots. However that might happen in a derailment, and from appearances, it has - at least twice.
Look at the lower right corner -- the damage is obvious. The side rail is cracked clean through, and the end case is slightly bent.

You can see the 16 wires that had to be disconnected. But that's not the hard part. The wires go through blocks -- these are not split "cleat blocks" like you saw before - these are solid blocks of wood. The wires can't be unthreaded from the blocks without unsoldering the end connectors. The best way was to remove each block, and its captured eight wires, as a set.
On the corners you see giant four-sided "bolt heads". That is exactly what they are - bolts with insulating material cast around the head. The rod is normal steel, but it's installed with an insulating sleeve and insulating washer. It insulates the hourglass-shaped casting which holds the electrical components of the reverser.
 The spaghetti in the middle is important too. Obviously the wires must go to the same places. They must also be relaid in the same layers, otherwise the wires won't fit under the reverser lid! Careful notes were taken.
When the blocks of wood were removed, one cracked right down the middle. It was the damaged side, naturally.
The reverser case disassembled with ease, and soon, the side rails and end caps were separated. Off to the bead blaster. Several things are readily apparent.

The pieces are pushed together for the photo. They are broken clean. You can also see some other cracks. It's also clear one of the latches had been damaged, and was ground off and a new latch was fabricated. You can see where the part had been previously broken and braze-welded. This was surely a "shop job" done by the Sacramento Northern or Western Pacific. Brazing is used on cast iron because it is almost impossible to weld cast iron. The operative word is "almost", and the Western Railway Museum has had great success having cast iron castings weld repaired by a specialist, Lock-n-Stitch of Turlock, California. The pieces are now there, awaiting repair. The surviving good parts were sent along as well, as examples.
Subscribe to:
Posts (Atom)